How to use our Paxinos Test template
The Paxinos Test template is designed to help healthcare professionals accurately diagnose acromioclavicular joint pain. Follow these steps to use the template effectively
Step 1: Grab a copy of the template
Click the "Use template" or "Download" button to obtain a copy of the Paxino's test so you have a clear and structured approach to performing and documenting the test, ensuring consistency and reliability in the results.
Step 3: Prepare the patient
Begin by instructing the patient to sit comfortably on an examination table or chair with their symptomatic arm resting by their side. Make sure the patient is relaxed and understands the procedure. Explain the test to gain cooperation and ensure they know what to expect.
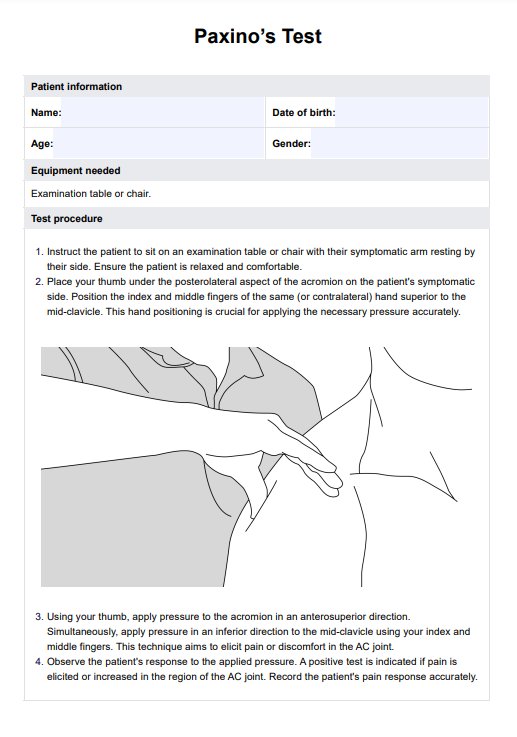
Step 3: Position the examiner's hands
Place your thumb under the posterolateral aspect of the acromion on the patient's symptomatic side. Then, position your index and middle fingers of the same (or contralateral) hand superior to the mid-clavicle. This setup is crucial for applying the necessary pressure to elicit a response.
Step 4: Apply pressure
Apply pressure to the acromion in an anterosuperior direction using your thumb. Simultaneously, apply pressure in an inferior direction to the acromion, index, and mid-clavicle with your index and middle fingers. This maneuver is aimed at provoking any pain or discomfort from the acromioclavicular joint.
Step 5: Monitor the patient's response
Observe the patient's reaction to the applied pressure. A positive test is indicated by pain elicited or increased in the AC joint region. Record the patient's pain response accurately in the results section of the template.
Step 6: Document the results
Use the template to document whether the test results are positive or negative. A positive test result suggests potential inflammation or irritation of the AC joint, while a negative result indicates no significant issues with the AC joint. Ensure all findings and observations are noted clearly.