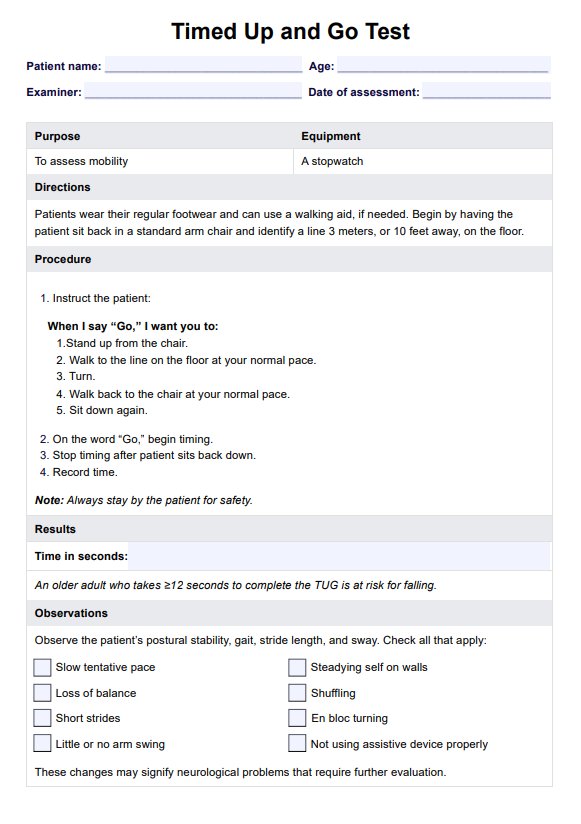
How to use the timed up and go assessment?
The Timed Up and Go Test is relatively easy for you to administer but can pose certain difficulties for your clients. Here are the steps involved in completing the test.
Step 1: Get the template
You can access the Timed Up and Go Test template from this guide. Click "Use template" to open it within the Carepatron platform, where you can customize this tool. You can also click "Download" for a free, fillable PDF copy of this assessment.
Step 2: Make the necessary preparations before administering the test
Before starting the test, you're going to need the following:
- Tape to make a 3-meter-long distance marker
- An armchair to be used as the starting and ending points of the test
- Ruler/yardstick to measure the distance for the tape
- Stopwatch to time your elderly patient
You also have to ensure your patient wears the footwear they usually wear. They may also use a walking aid if they need to. By aid, we mean something like a walking stick, not a person. Once you have these, have your patient sit on the chair and ensure the distance marker is three meters from the chair.
Step 3: Inform your patient about the instructions
Once everything is prepared and your patient is ready, give your patient these instructions so they know what to do:
- The test starts when you say "go".
- When you say "go," they must stand up from their chair and walk towards the distance marker.
- Once they reach the distance marker, they must turn around, walk back to the chair, and sit down.
- They only need to walk at the normal pace that they do.
You will start your stopwatch timer as soon as you say "go" and then stop it as soon as they sit back down. The test has no time limit. They can stop walking and rest but not sit down except on the chair.
Step 4: Have them do a trial test
Once your patient understands the instructions, have them perform a practice test. The timing should not be recorded for this trial run, but it helps ensure they understand the steps and feel comfortable with the process. This can also provide an opportunity to discuss any previous self-reported fall events, which may help inform your overall assessment.
Step 5: Do an official test after the practice test
After the practice test, let the client rest briefly, then start the actual test. As they go about their walk, make sure you observe your patient and note down anything you notice, like the following:
- Their gait and gait speed
- If they sway
- If they have stable posture or not
- The length of their strides
- If they're shuffling
- If they swing their arms or not
- If they're having a hard time using their walking aid
Step 6: Make an assessment based on the results and make a plan accordingly
If your patient scores above 12 seconds, they are at a high risk of falling. In a study cohort, the patient was at risk of future falls, with an average TUG score of 13.15 seconds, exceeding the 12-second cutoff for community-dwelling older adults. Those scoring over 12 seconds should undergo further mobility assessment to help prevent falls (Kumar & Biswas, 2020).
If they score above 30 seconds, that doesn't just mean they have a high risk of falling. It also means that if they do fall, they may require walking aids and supervision for ADLs. You might want to do this test multiple times every few days to better understand your patient's mobility. A better picture of their mobility means you can make the appropriate care plan.